https://www.youtube.com/watch?v=aGRPQgf9HH0

@MikrotikCCR [RB Induk]
@[CCR] basic konfig RB Utama
- basic konfig
- ganti identity >> masuk menu System >> Identity
- kasih IP menuju uplink >> IP >> DHCP Client >> ether1
- kasih NAT masquerade >> IP >> Firewall >> NAT >> out interface:ether1 >> action:Masquerade
- Buat VLAN, add interface >>
- buat interface VLAN100, VLAN ID:100, @interface:ether2
- buat interface VLAN200, VLAN ID:200, @interface:ether2
- buat VLAN99-MNGT, VLAN ID 99, @interface:ether2
- buat IP Address, add IP Address
- add IP 192.168.100.1/24, interface =VLAN100
- add IP 192.168.200.1/24, interface =VLAN200
- add IP 192.168.99.1/24, interface =VLAN99-MGMT
- buat DHCP Server
- Mengg. “DHCP Setup”, di interface VLAN100, >> next next seperti biasa
- Mengg. “DHCP Setup”, di interface VLAN200, >> next next seperti biasa
- Mengg. “DHCP Setup”, di interface VLAN99-MGMT, >> next next seperti biasa

@CRS326 [SW1 / Switch 1] – Switch Induk
- set identity >> SW1
- masuk menu “Bridge” lalu klik add/+
add:bridge1
buka properties bridge1
masuk tab “VLAN” lalu aktifkan “VLAN Filtering” - masuk menu “Bridge” >> buka Tab “Ports”
tambahkan port di “bridge1” :
+ ether1 (trunk-ke router induk)
+ ether2 (trunk ke SW2)
+ ether9 akan berperan sebagai Access VLAN100 ➡️➡️ set PVID = 100
+ ether10 akan berperan sebagai Access VLAN200 ➡️➡️ set PVID = 200 - masuk menu “Bridge” >> lalu menu “VLANs”
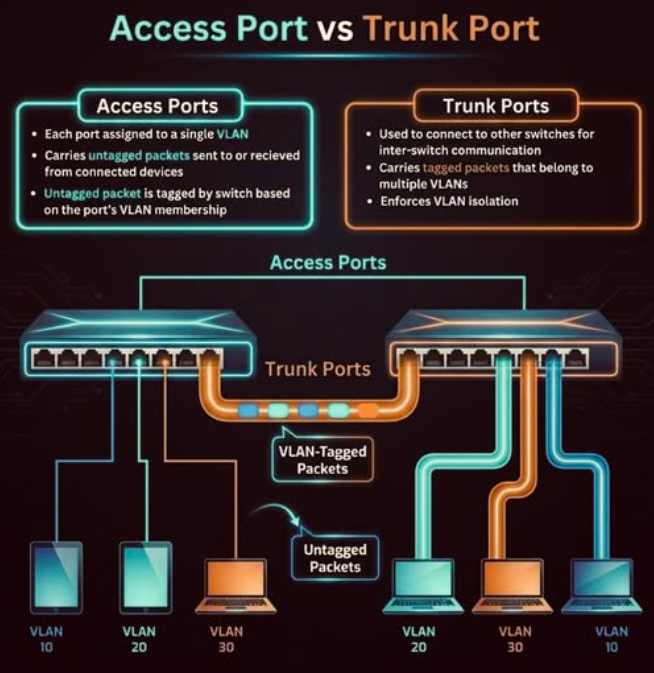
“menentukan mana sebagai trunk & mana sebagai access port”
tagged = Menambahkan tag (penanda) unt interface VLAN/trunk port
untagged = (tanpa tag) Access port/perangkat akhir atau end device
Konfig u/ Port acccess :- bridge1 >>
VLAN IDs:100 >>
tagged (trunk) = ether1, ether2 >>
Untagged (access):ether9 - bridge1 >>
VLAN IDs:200 >>
tagged (trunk) = ether1, ether2 >>
Untagged (access):ether10
- bridge1 >>
- Bridge management =
- bridge1 >>
VLAN IDs:99 >>
tagged (trunk) = ether1, ether2, bridge1
- bridge1 >>
- buat VLAN Management (menambah interface baru berupa VLAN)
- add interface >> VLAN99 >> Vlan ID : 99 >> Interface : Bridge1 >> tambahkan VLAN 99
- aktifkan DHCP Client di interface bridge1
masuk menu “DHCP Client” >> add interface >> VLAN99


@CRS326 [SW2 / Switch 2] – Switch Anak
- Ganti nama >> System >> Identity : SW2
- buat bridge >> Bridge1
buka properties bridge1
masuk tab VLAN lalu aktifkan “VLAN Filtering” - masuk menu Bridge >> Ports, lalu tambahkan anggota dari Bridge1
- add ether1 sebagai trunk-induk
- add ether9 (access port) >> PVID = 100
- add ether10 (access port) >> PVID = 200
*Port VLAN ID (PVID) : ID VLAN default yang diberikan ke frame masuk (incoming untagged packet) di suatu port. Artinya : Jika sebuah frame masuk ke port bridge tanpa tag VLAN (untagged), maka akan otomatis diberikan tag VLAN sesuai PVID yang diset pada port tersebut.


- masuk menu Bridge >> VLANs
“menentukan mana sebagai trunk & mana sebagai access port”- add Bridge:Bridge1
>> VLAN IDs:100
>> Tagged:ether1
>> Untagged:ether9 - add Bridge:Bridge1
>> VLAN IDs:200
>> Tagged:ether1
>> Untagged:ether10 - add Bridge:Bridge1
>> VLAN IDs:99
>> Tagged:ether1,bridge1
- add Bridge:Bridge1
- buat VLAN Management
- add interface VLAN
- Name : VLAN99-MGMT
- Vlan ID : 99
- Interface : Bridge1
- add interface VLAN
- aktifkan DHCP Client di interface VLAN99
masuk menu “DHCP Client” >> add interface >> VLAN99-MGMT


- lakukan pengecekan ke interface access sudah sesuai/belum dengan yg diharapkan.
- tes VLAN 100, tes VLAN 200, tes VLAN Management

Alternatif tambahan untuk konfig lanjutan membuat agar ether9 s/d ether16 jadi access port & ether17 s/d ether24 jadi access port, contoh di SW1 & SW2 :
- buat interface VLAN baru 2 buah (untuk VLAN100 & VLAN200) dengan interface’ny adalah Bridge1
- lalu buat bridge baru >> Bridge2 & Bridge3
- lalu jadikan anggota port Bridge2 = VLAN100 + ether9 s/d ether16
- lalu jadikan anggota port Bridge3 = VLAN200 + ether17 s/d ether24
